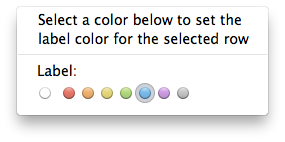
A Label Color Picker Menu Item
Since OS X 10.5 custom views have been allowed in menus. This adds a lot of flexibility to menu items that was not previously available. One example of this in practice is Snow Leopard’s Finder label color picker. Similar functionality is required for many applications. It can certainly be achieved in a less elegant way using sub-menus containing the names of the color labels available, but why not do it better? The example I’ll give here more closely resembles Aperture 3’s label colour picker menu item than the Finder’s, since it looks quite a bit nicer.

The code is based on Apple’s MenuItemView sample code. Since much of the code comes directly from the Apple code, this post is mainly to demonstrate:
- How to expand on that code to fully implement a label color selector.
- An example of a more attractive version of the menu item that could be used in an actual shipping application.
- NSTableView’s clickedRow: method which allows you to access the row that was right-clicked on without actually selecting that row.
- Custom drawing in code. No image files are used in this sample.
- Displaying custom highlighting in a table view, without overriding any private methods.
- Use of a protocol for a delegate to the custom menu item view.
The Setup
The basic concept is that a a custom NSView can be embedded into a menu. This example uses an NSView subclass called CCTColorLabelMenuItemView.
@interface CCTColorLabelMenuItemView : NSViewObviously this menu item needs to have some effect on your application, such as coloring the selected row of a table view, or it isn’t of much use. Additionally, it needs to have an effect on some model object in your application, setting a label variable somewhere. In this project a class named CCTRowItem is used. The main controller object, CCTLabelPickerController, will create some instances CCTRowItem to display in the table view. These are meant to represent the real model objects you might have in your project. CCTRowItem is simple, and just contains some instance variables to show in the table, plus a labelColor variable.
@interface CCTRowItem : NSObject

{

NSString *name;

NSNumber *amount;

NSInteger labelColor;

}

@property (nonatomic, retain) NSString *name;

@property (nonatomic, retain) NSNumber *amount;

@property (nonatomic, assign) NSInteger labelColor;
@end
It’s that labelColor variable that the custom menu view will set.
The Custom Menu Item
Installing a custom view in a menu item is actually quite simple. Create a menu item with an action and target as you normally would, then assign an instance of your custom view using the setView: method. Your view will then be shown in place of the regular menu item.
NSMenuItem *item = [[NSMenuItem alloc] initWithTitle:@"Label"

                                              action:@selector(applyLabelToSelectedRows:)

                                       keyEquivalent:@""]];

CCTColorLabelMenuItemView *labelTrackView = [[[CCTColorLabelMenuItemView alloc]

                                                                 initWithFrame:viewRect];

[item setTarget:self];

[item setView:labelTrackView];
Since this really is just a standard view, you can do whatever you would do in a regular NSView subclass. In this example NSTrackingArea objects are applied to the view in order to track which color the mouse is over. Through the mouseEntered: and mouseExited: events they generate, the user interface is updated to display the appropriate visual feedback to the user.
When a the mouse is released over a color dot a blinking selection animation is played. The only tricky part here is that the timer used to trigger the on and off steps in the animation needs to be added to the NSEventTrackingRunLoopMode run loop, since that is the active mode when a menu is being tracked. At the end of the blink animation the menu item’s assigned action method is manually sent to its assigned target object. The menu item object is obtained using NSView’s enclosingMenuItem method.
NSMenuItem *mi = [self enclosingMenuItem];
[[mi target] performSelector:[mi action] withObject:self];
As in any view subclass all of the custom drawing is handled in drawRect:. The code used to draw the shaded dots may be of interest to those learning about drawing in code and avoiding adding unnecessary image files to your project.
The last thing to worry about here is providing the menu view with information from the model object about which, if any, label is already selected. In the case that a table row already has a label color assigned, it will be represented by adding a dark outline around the dot.
To accomplish this, a simple delegate system is used. The view defines a protocol that its delegate must implement:
@protocol CCTColorLabelMenuItemViewDelegate

- (NSInteger)currentlySelectedLabel:(CCTColorLabelMenuItemView *)colorLabelMenuItemView;

@end
The idea is that if a delegate is assigned, the view can ask it for information about what label color is currently selected. Assigning a delegate is not mandatory, so if no delegate is assigned the selection indicator is not shown. In this sample, our main controller is assigned as the delegate, and returns the currently selected row’s label.
Displaying the Label Color
Now that the label color has been set on the model object, the table view needs to display the selected label. To do so, override two methods in a custom subclass of NSTableView:
- (void)drawRow:(int)row clipRect:(NSRect)clipRect
- (void)highlightSelectionInClipRect:(NSRect)clipRect
The first method corresponds to drawing when the row is not selected, and the second applies to when the row is selected. Different drawing is desired in each case, as the row selection highlight needs to be shown when it would otherwise be obscured by our custom label color. The Finder handles this by showing the label color as just a dot on one end of the row when that row is selected.
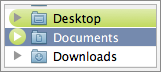
The same approach is taken in this code. In both methods, an NSBezierPath is created in the shape the label color should appear in, then an NSGradient is drawn into that shape. In highlightSelectionInClipRect: the standard selected row highlight must also be drawn, since that responsibility has been taken over from the table view.
That almost does it, but leaves one problem. NSCell, subclasses of which are used to display information in the table view, also draw their own highlighting when their row is selected, and this highlighting will display on top of the custom label drawing in highlightSelectionInClipRect:. To remedy this you will sometimes see people recommending the following method override in your NSTableView subclass:
-(id)_highlightColorForCell:(NSCell *)cell
{
    return nil;
}
However, since this is a private method, it’s not a good idea to override it in shipping code. Luckily, there is another option. Create an NSCell subclass (in this case an NSTextFieldCell subclass) and assign it to your table cells in Interface Builder:

Then, override this method:
- (NSColor *)highlightColorWithFrame:(NSRect)cellFrame inView:(NSView *)controlView

{

    return nil;

}
It’s slightly more fiddly in Interface Builder, but the code is just as simple and works just as well, without dealing with any of the mess of private methods.
Download the Sample Code
Note that this code will only run on OS X 10.6 or newer because of the use of the clickedRow: method that was introduced in that OS version. The basic concept would be the same and it would be easy enough to make it also work on 10.5 without that functionality, instead just selecting the row that is right-clicked on by overriding -menuForEvent: in your NSTableView subclass.
Apple provides some additional useful information about views in menu items.


This indeed is a nice trick. I’m using it in my Backup Application to allow users to ‘color tag’ a backup in the Backup Browser. It gives the users a uniform experience across the Finder and the App, in my opinion. I also have a HUD-style inspector, which contains a HUD drop-down button which in turn opens up a menu with only this control for the selected table row. I’ll have to do a bit of work to HUD-ify it and to maybe even have the control display the color in it, even when this menu view is not shown.
I hope to see more awesome stuff like this from you in the future.